Reading time: 7 minutes
If you ever tried to put all pictures and videos of your friends and family in one place then you know, how much storage it can take. Nowadays with photo bursts and footage up to 4K on a basic smartphone this gets even worse. My wife's iPhone literally refuses to work when it's memory is full, and I thought I would never fill up my 256Gb Samsung. Well it happened, we had to set up one common place to save our family media. My Cloud Journey had started and I am an IT guy after all, so this was inevitable. Enjoy!
Conditions
Machine
It has been a long time since I had a PC, the system block paint in black (or white, if we talk about ancient times), which stands under the table constantly buzzing with coolers (sweet nostalgy). Now I am mostly into laptops as this is more convenient, the performance is more or less the same and the machine is smaller in size (and I can lie down on a couch with it, biggest advantage yet!). So the first thing would be to get a machine with good hardware, free software and small size. You guessed it, I bought Raspberry Pi 5 with 8Gb RAM with a small case and it fits my hand easily, which is cool! And for storage I acquired a 256Gb SSD.
You may think that I could have bought an older version of RPi with less RAM, but I just wanted to have the best Pi out there for the sake of research and learning, and it is not that expensive, so why bother myself with doubts.
Network
In order to access my Cloud server from the outside, I had to configure my router (gigabit Mercusys) to allow certain ports to be forwarded, which is a standard and easy thing to do. But it turned out that my ISP in order to save version 4 IPs has set up their own router right after mine. This left me with the setup called double NAT, where basically it means that I share public IP with some other users (most probably my neighbors). Of course the real setup is more complex as ISP may have switches in place before their routers and then they have modems for signal conversion or maybe they have combo gateway, it really doesn't matter. What matters is that my Cloud Journey was overshadowed by this fact. But I will surely figure this out and you will know how a bit later.
Config
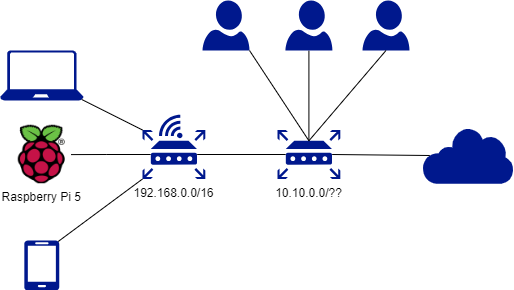
So then I had to decide, which approach and software I could use. For me, Cloud means that you can access something over the internet, that's it, everything else is marketing ( dodging tomatoes ). I mean, if I understand the marketing narrative correctly, then building for example FTP on your local machine means that you are building FTP server. If you build FTP on some remote VM instance of some provider, then it is considered Cloud storage. I guess this could be a topic for a separate article. Anyways, I had to choose, either to use SMB, (S)FTP, NFS or WebDAV. So there is a bunch of free open-source software for any of these, but I prioritized features like user-fiendly UI, native smartphone app, big community and Cloud office. The choice was obvious, I had to install Nextcloud which uses WebDAV protocol. And for the sake of easy config management I wanted to use a separate isolated environment, in simple words to run Nextcloud in a Docker container. I don't know network diagram standards, but this high-level picture shows the general idea behind AS-IS setup:
Double NAT Workaround
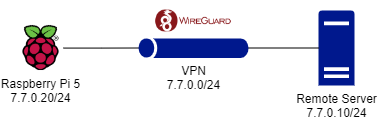
Since I am not a network guy I knew little about routing, tunnels, firewalls, dns etc. And don't get me wrong, I still know little, but just a bit more thanks to this small project of mine. So I had to find the way to get around double NAT and the easiest one would be to call my ISP and ask for a separate public IP. But this would be too easy. There was also an interesting suggestion to make your router work as an Access Point so that it wouldn't run it's own DHCP or perform NAT, but just get all of these settings from the primary ISP router. I can tell that I don't see the bigger picture here, but my primary concern was that I loose control over my LAN and any new device would need to have a separate lease allocated for it (for which my ISP requires my personal data to be entered). So this was also something I wouldn't like to go with. Then I found that you can basically create a secure tunnel between your local machine and remote server, which has a separate public IP, and setup proper traffic routing. You can simply do this with WireGuard. I liked the idea and decided to give it a try.
Setting Up a VPN tunnel
When you set up a tunnel you basically create a subnet for it by defining a custom virtual network interface with static IPs of the subnet peers. You also would obviously need to generate private and public keys to be used by the peers. Then it is required to define Remote Server as a static endpoint for Raspberry Pi.
Routing Traffic
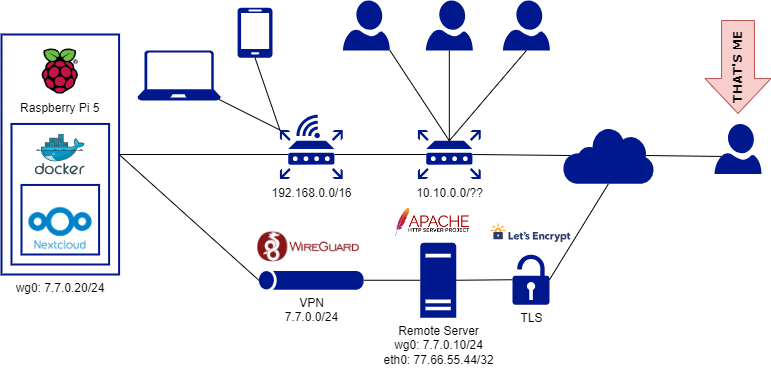
WireGuard allows to set iptable rules inside the virtual network interface config file while it is up and running. Basically you just tell your Remote Server to perform NAT (yes, double NAT again, but controlled by you). Remote Server becomes kind of a "jump server" to the internet.
Reverse Proxy
The Remote Server is the main endpoint from which we would need to access our Cloud Storage. To forward external client requests to proper host we need a proxy to be set, specifically a reverse proxy. For this part Apache was used as a web server. Basically in Apache site config I specify how to handle different requests via different ports, obviously the main ones are the HTTP (80) and HTTPS (443) protocols.
Firewall
Obviously I had to configure simple firewall rules with 'ufw' tool, nothing special there.
Deploying Nextcloud
So now we need to deploy our Nextcloud server, so let's review high-level tasks for this.
Install Docker
Nothing fancy here, you just need to get the working package for Docker.
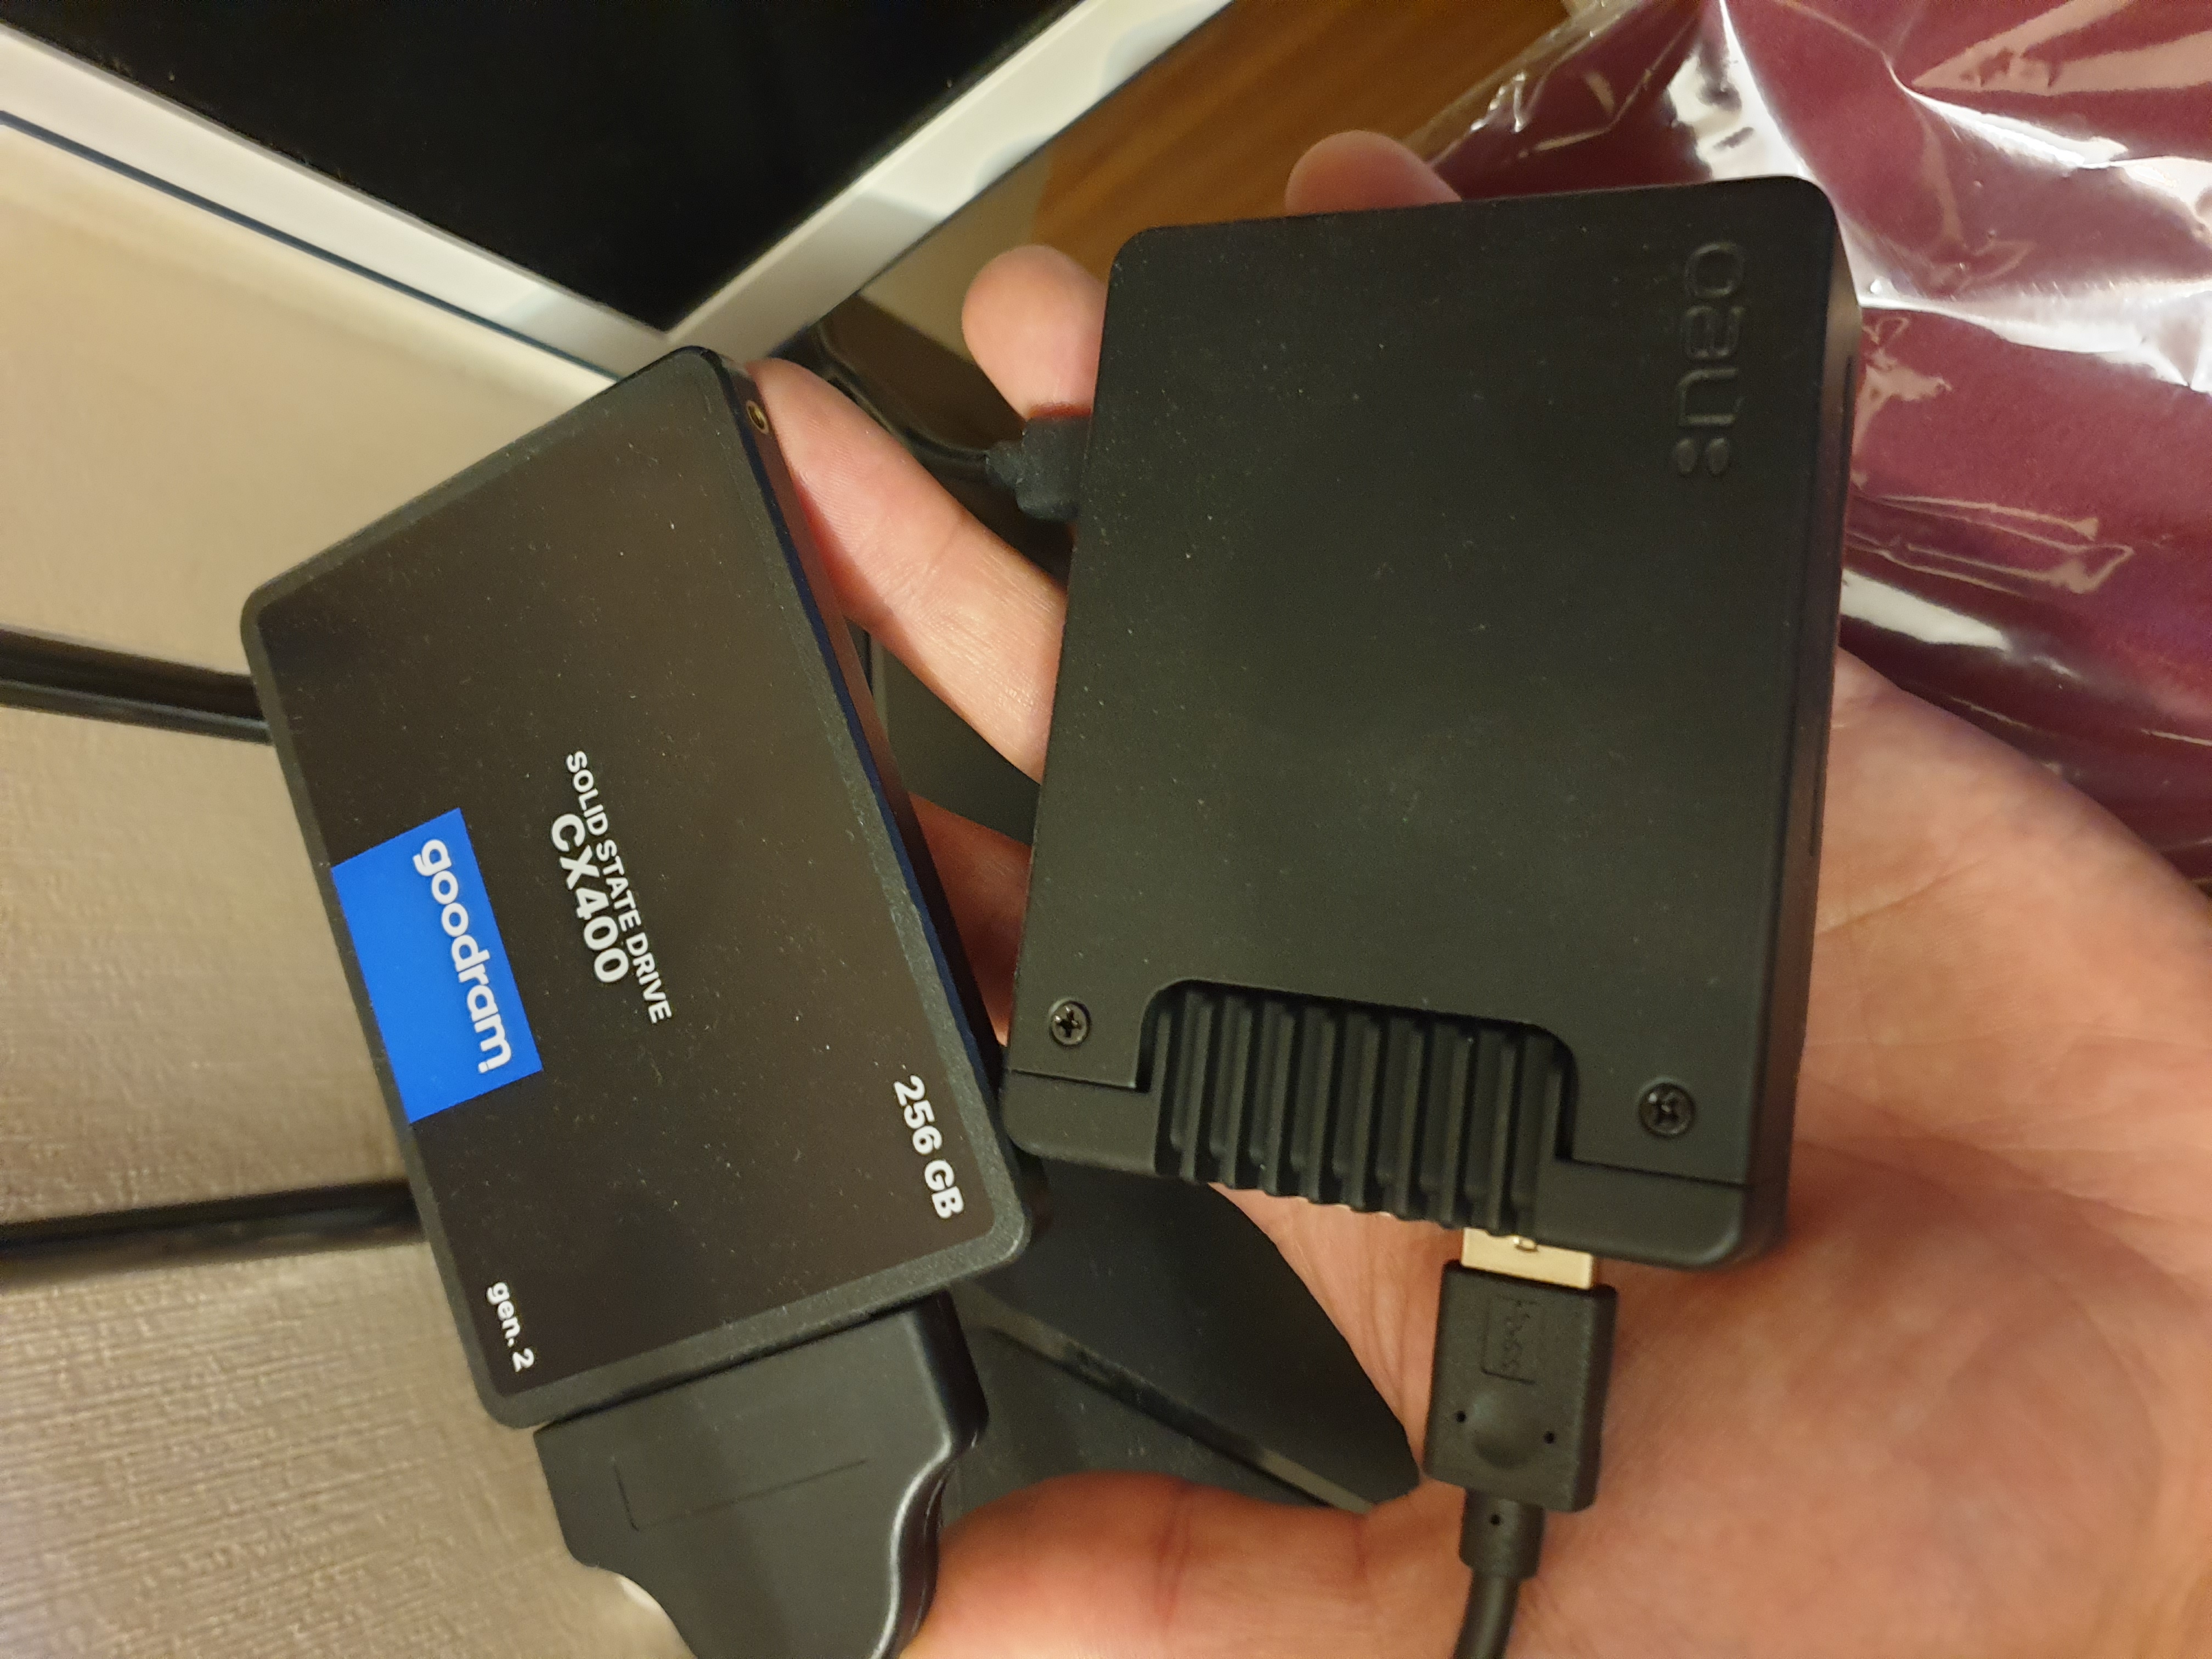
Mount Your SSD
You can see from the image above, I have bought a USB to SATA adapter to connect my drive to RPi, simple as that. Then I would need to mount it, a pretty simple thing to do in Linux if you have your external drive partitioned appropriately.
Run Nextcloud as a Container
So basically you run Nextcloud as a container, but with external volumes defined for some folders. You guessed it, external volume is the SSD mounted to RPi. But it doesn't end here, because you would also need to forward ports (I did it as 8080:80) and then edit the PHP config.
Routing Traffic... Again
So you should remember that we have set some rules to route traffic on the Remote Server. Now we need to do kind of the same thing on our RPi, so that our container with Nextcloud would be accessible from the external world. For this part I have discovered 'socat' tool, which did everything I wished for with one simple line of command.
Additional Configurations
Domain Name
Nothing special to cover here, I have created a subdomain on duckdns.org just for convenience.
Apache Configuration
On my Remote Server I have already some other web-apps running obviously under the same IP, but different ports. So to make things pretty and for my domain to work, because you can only tie your domain name to your IP without port number (it was a surprise for me), I had to configure my Apache to have some reverse proxy forwarding in place.
Setting HTTPS
One last thing was setting up secure connection with TLS, so I have used Let's Encrypt (awesome service!) to get the certificates and then I have updated my Apache configuration.
Voilà!
Our personal Family Cloud Storage server is up and running!
Summary
Wow, this kind of looks easy, when you read it this way, but it took a while to learn it and put everything in place. As you might have noticed by looking at the title of this article, I will write a second part, which will consist of specific examples with commands/code. I thought it would be too long to have everything here and I also tried to keep my descriptions of steps pretty short. Stay tuned!
Be curious, be proactive and take care!
Best regards,
Ed