Reading time: 7 minutes
Hello again. It has been a while, but I have finally made it to the second part of my cloud journey. In this article, we will review the mighty scripts that made my setup work. It seems the setup has been stable during this whole time, which is good. I have found only one thing that really annoys me, but it is not related to performance but rather to additional functionality capabilities. So, let's start.
Setting up RPi
NOTE: All IP addresses are used as an example, please choose the ones relevant for you.
Let's use this diagram as a reference:
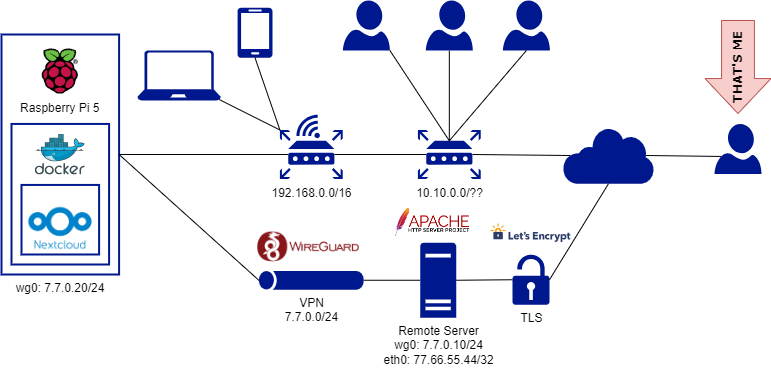
Nextcloud
Shout-out to the great video, which describes all the steps, so if you don't trust me, just visit the Techdox YouTube channel.
- First install Docker on your machine, I won't go through it, simply prompt it.
- Now you will need to mount your external drive (just make sure you connected it to your machine) and for this we would need to do the following:
# Remember to use 'sudo' to elevate your commands if required
# Check available storage

fdisk -l

# You should be able to find a device named something like '/dev/sda1'
# Then create a directory, where you would like to mount your storage to, and mount your storage

mkdir /mnt/external
mount /dev/sda1 /mnt/external

# Run the command again to make sure it is mounted

mount /dev/sda1 /mnt/external

# Should get something like 'mount: /mnt/external: /dev/sda1 already mounted on /mnt/external.'NOTE: After reboot, your external storage will be unmounted, so in order to make it permanent, make sure you check out this instruction on linuxbabe.com
- Next you would need to create folders for your Nextcloud app:
cd /mnt/external

mkdir nextcloud apps config data theme

ls
- After you're done with that, you can run the Docker container with Nextcloud:
sudo docker run -d -p 8080:80 --name nextcloud --restart unless-stopped \
-v ~/mnt/nextcloud/cloud:/var/www/html \
-v ~/mnt/nextcloud/apps:/var/www/html/custom_apps \
-v ~/mnt/nextcloud/config:/var/www/html/config \
-v ~/mnt/nextcloud/data:/var/www/html/data \
-v ~/mnt/nextcloud/theme:/var/www/html/themes \
linuxserver/nextcloud

# Then check your container
sudo docker ps -a
NOTE: Remember, that you can use any desirable port, but better not to use standard HTTP (port 80) as a best practice.
- Now, you can check if Nextcloud is working by using your localhost:8080 address and set it up, I won't cover this part because it is fairly easy.
Wireguard
Next stop is to setup and configure Wireguard VPN (in my case not just for secure connection, but also to get around Double NAT). This was quite a journey as I remember, took me a while to understand how to properly do it. I will just paste the sequence of commands below.
NOTE: It was meant to be a script, but the exchange of Public keys still have to happen manually, so although incorrect, I just left it as it is.
# Install WireGuard
sudo apt install wireguard

# Enable IP forwarding > net.ipv4.ip_forward=1
sudo sysctl -w net.ipv4.ip_forward=1
sudo sysctl -p /etc/sysctl.conf
sudo systemctl daemon-reload
sudo systemctl restart systemd-networkd

# Generate keys
wg genkey | sudo tee /etc/wireguard/private.key
sudo chmod go= /etc/wireguard/private.key
sudo cat /etc/wireguard/private.key | wg pubkey | sudo tee /etc/wireguard/public.key

# Export keys
export HOME_PRIVATE_KEY="$(sudo cat /etc/wireguard/private.key)"
export HOME_PUBLIC_KEY="$(sudo cat /etc/wireguard/public.key)"

# WireGuard config
sudo tee -a /etc/wireguard/wg0.conf <<EOT
[Interface]
Address = 7.7.0.20/24 # Set the Wireguard network interface address
PrivateKey = $HOME_PRIVATE_KEY

[Peer]
PublicKey = $VPS_PUBLIC_KEY # Note that you don't know this one yet, the next steps will follow
AllowedIPs = 0.0.0.0/0
Endpoint = 77.66.55.44:51820 # Enter VPS IP Here
PersistentKeepalive = 25
EOT

#Run WireGuard
sudo wg-quick up wg0

# Turn on after reboot
sudo systemctl enable wg-quick@wg0

sudo -p systemctl
So the idea is to explicitly define your VPS endpoint (remote server IP) and share your Public keys between the Host/Peer and the Endpoint.
Network (Nextcloud <---> Wireguard)
There is one more thing. As you may have noticed, I am using Docker port forwarding from Docker network port 80 to our local network port 8080. And now I need to somehow tell Wireguard to route traffic from newly created wg0 interfaces (7.7.0.2) to localhost port 8080. For this I have used a tool called socat and it worked like a charm:
socat TCP-LISTEN:8080,fork,reuseaddr TCP:7.7.0.20:8080Other Stuff
There are some things we still would need to do on Raspberry Pi, but let's first configure our VPS.
VPS
Remote Server
So now we are getting to that interesting part of setting up the server. For my VPS I use Hetzner Cloud as I find it as a very good and cheap VPS provider for most of the task you may think of as a lone developer (by the way this link will give you €20 in cloud credit for your own needs). Once you set up your VPS (with Linux, of course) start by updating the list of packages and perform the following steps to setup the Wireguard.
# Install WireGuard
sudo apt install wireguard

# Enable IP forwarding > net.ipv4.ip_forward=1
sudo sysctl -w net.ipv4.ip_forward=1
sudo sysctl -p /etc/sysctl.conf
sudo systemctl daemon-reload
sudo systemctl restart systemd-networkd

# Generate keys
wg genkey | sudo tee /etc/wireguard/private.key
sudo chmod go= /etc/wireguard/private.key
sudo cat /etc/wireguard/private.key | wg pubkey | sudo tee /etc/wireguard/public.key

# Export Keys
export VPS_PRIVATE_KEY="$(sudo cat /etc/wireguard/private.key)"
export VPS_PUBLIC_KEY="$(sudo cat /etc/wireguard/public.key)"

# WireGuard Config
sudo tee -a /etc/wireguard/wg0.conf <<EOT
[Interface]
ListenPort = 51820
PrivateKey = $VPS_PRIVATE_KEY

# For proper traffic forwarding through VPN we need to have these parameters
PostUp = iptables -A FORWARD -i %i -j ACCEPT; iptables -t nat -A POSTROUTING -o eth0 -j MASQUERADE; iptables -A FORWARD -o %i -j ACCEPT
PostDown = iptables -D FORWARD -i %i -j ACCEPT; iptables -t nat -D POSTROUTING -o eth0 -j MASQUERADE; iptables -D FORWARD -o %i -j ACCEPT

[Peer]
PublicKey = $HOME_PUBLIC_KEY # Public key from RPi comes here
AllowedIPs = 7.7.0.0/24
Endpoint = 10.10.0.100:37015 # Specify your external IP and port 37015 for UDP connection
EOT

# Run WireGuard
sudo wg-quick up wg0

# Turn on after reboot
sudo systemctl enable wg-quick@wg0

# Ping the Peer
ping 7.7.0.20
NOTE: Also don't forget to configure Firewal rules to allow connections through port 51820 for Wireguard and port 22 for SSH (use either ufw tool or create this rule on Hetzner Cloud platform)
If everything is done correctly, then you should be able to ping your Peer and even check, whether the Nextcloud is working by using the address 7.7.0.20:8080 (or the one, which you have chosen). And yes you may either check it by using some Linux GUI or just by connecting with curl like this:
curl -v http://7.7.0.20:8080Other Stuff
So since now we are able to connect to our Nextcloud from our VPS, we still need for it to be accessible externally, but before we would do it, let's configure our HTTPS.
HTTPS
Let's make our connection secure before making it available to be accessed externally.
Apache
Apache will be forwarding requests to the right endpoint, so go with these commands.
sudo apt update
sudo apt install apache2

sudo nano /etc/apache2/sites-available/mycloud.mydomain.com.conf

# Paste this
<VirtualHost mycloud.mydomain.com:443>
     ServerName mycloud.mydomain.com
     ProxyPreserveHost On
     ProxyPass / http://7.7.0.20:8080/
     ProxyPassReverse / http://7.7.0.20:8080/
     ErrorLog ${APACHE_LOG_DIR}/error.log
     CustomLog ${APACHE_LOG_DIR}/access.log combined
     SSLEngine on
     Include /etc/letsencrypt/options-ssl-apache.conf
     SSLCertificateFile /etc/letsencrypt/live/mycloud.mydomain.com/fullchain.pem
     SSLCertificateKeyFile /etc/letsencrypt/live/mycloud.mydomain.com/privkey.pem
</VirtualHost>

sudo a2enmod proxy
sudo a2enmod proxy_http
sudo a2enmod proxy_balancer
sudo a2enmod lbmethod_byrequests

sudo a2ensite mycloud.mydomain.com.conf

sudo systemctl reload apache2
Now we need to create SSL/TLS certificates from Let's Encrypt, which are totally free. There is a nice tool to help you out with that, which is called certbot. The steps are simple, but need first to know, which domain you would use (I can suggest to go with duckdns.org if you don't want or have a paid one.)
sudo apt update
sudo apt install certbot python3-certbot-apache

# Then follow the steps provided by this command
sudo certbot --apache
Once you're done, you may need to perform one last step on RPi. In order to be able to connect to the Nextcloud via your domain name, you need to explicitly specify, that such connections are allowed. For that go to your RPi and get inside Nextcloud Docker container bash:
sudo docker exec -it nextcloud /bin/bash

cd /var/www/html/config

nano config.php

# Add the following and save
'trusted_domains' =>
  array (
    0 => 'mycloud.mydomain.com',
  )
...
'trusted_proxies' =>
  array (
    0 => '7.7.0.20:8080',
  ),
Now you may need to restart your Apache on VPS and again check all Firewall rules and test if you really can connect to your Nextcloud externally.
Voila! (I guess...)
Now this was the second part of my Cloud Journey. It was full of both pleasure and pain, but totally worth it. I use my Cloud on a daily basis from every part of the world. And I really hope, that this article may help you to do the same.
Be curious, proactive and take care.
Best regards,
Ed